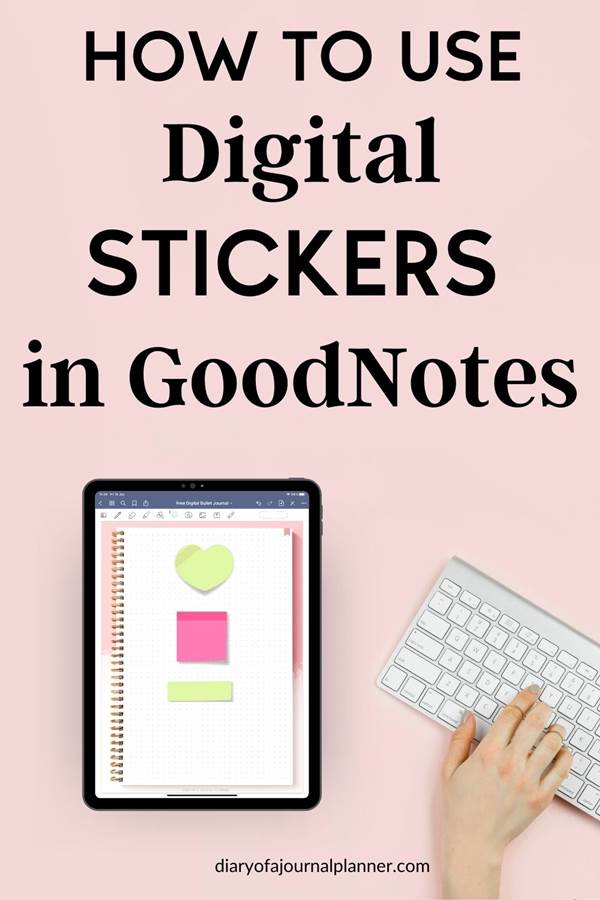
How To Use Digital Bullet Journal Stickers
New to digital planning and heard how amazing digital stickers? But how do you use planner stickers? Find out everything you need to know in our easy digital planner sticker tutorial.
One of the things we all love about planners and Bullet Journals is that we can get creative by making them personalized and unique. So how do we do that when we use a digital Bullet Journal?
With digital stickers!
Just like in a traditional paper Bullet Journal, we use digital stickers to create themes, styles and make information stand out.
And the best news is that even if you are a digital bullet journal beginner it is super easy to add digital stickers to your planner.
What Are Digital Stickers?
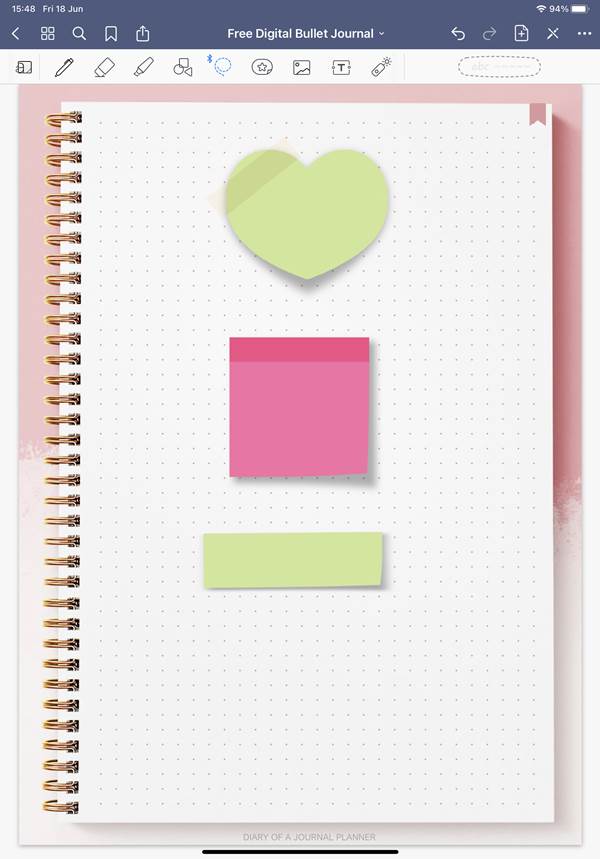
Digital stickers are digital images that you can add to your digital planner or journal. You use them to decorate your Digital Bullet Journal pages in the same way you would with real stickers in a traditional Bullet Journal.
They come in JPEG or PNG format. These different formats mean a few different things with digital stickers.
- JPEG Digital Stickers – A JPEG file means the digital sticker will come with a background (usually white). This means if you place your sticker on a lined or patterned page in your planner you will see the sticker design and a background area around the sticker. Don’t worry we will show you how to crop these later in the post.
- PNG Digital Stickers – A individual PNG file format means that each digital sticker is a separate file and has a transparent background. These are the easiest stickers to place as they can go on any background in your planner without cropping.
Why Use Digital Stickers?
Well, there are so many reasons but here are just a few:
- They are better for the environment than real stickers
- You can reuse them over and over in all your planners or journals
- You save money and never have to print stickers again!
Where can I get Digital Stickers?
You can create your own digital stickers but most of us find it much easier to buy pre-made ones.
Etsy is a great place to start looking for Digital stickers.
Where Can You Use Digital Stickers?

We love to use Digital stickers to help us create themes in our Digital Bullet Journals. It’s so easy with colors and images! You can add them in borders, in blank spaces on your page, and everywhere in between, just like a traditional Bujo.
Another way we use stickers is to help make important information on our planner pages stand out. It can be easy to skim over information on your iPad so having a sticker that really stands out makes us stop and take notice.
Of course, you don’t have to use them just in your Digital Planner. Once you have a sticker you can use it on any digital document you edit.
How do I download digital planner stickers to GoodNotes?
There are 3 ways to add digital planner stickers to GoodNotes:
- Make Elements collection inside the app
- Adding images from the photo tab on the menu
- Importing GoodNotes stickers books to the app
Option number 1 is the easiest but I will walk you through all the possibilities.
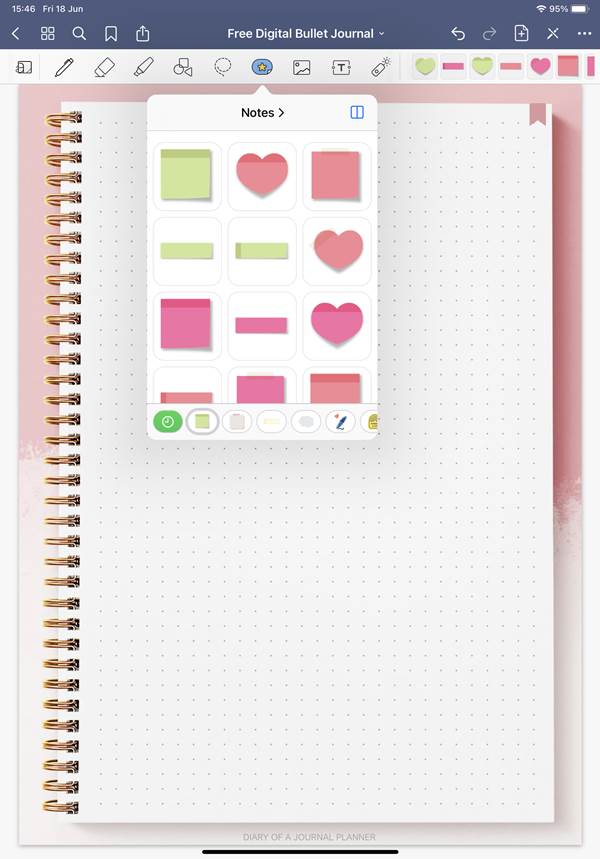
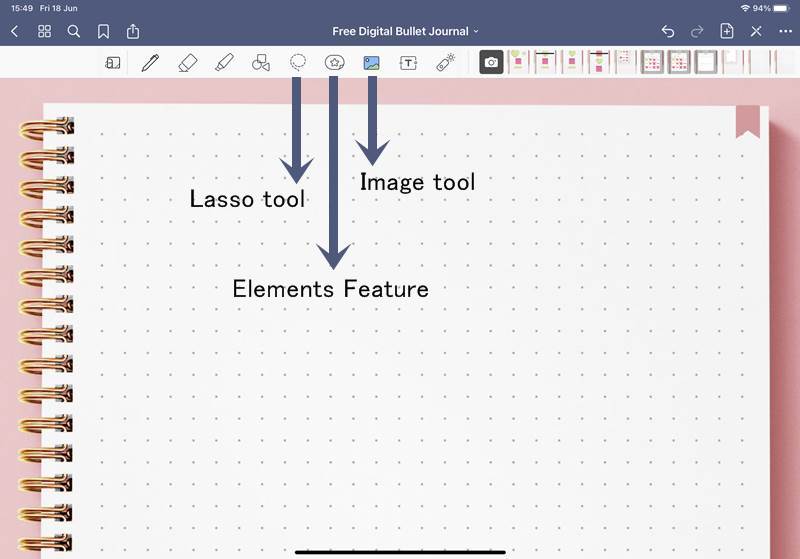
1. Making Sticker Collection using the elements feature
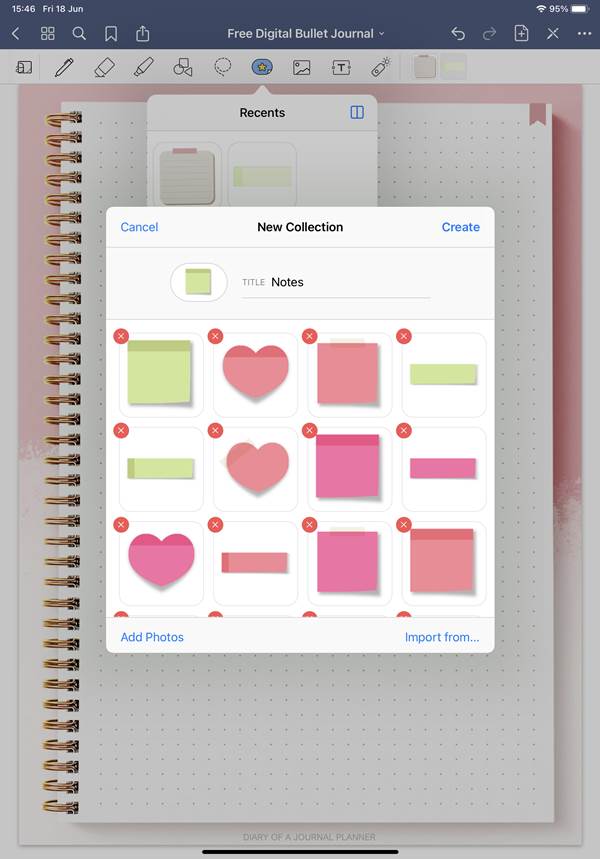
The recent version of GoodNotes 5 have a great new feature called ELEMENTS. Elements make it easy for you to re-use graphics, images or text inside GoodNotes.
The elements tab already comes with a few sets for you to use but you can also add your own.
Our number one tip is to create a separate ‘element’ folder inside GoodNotes for a set of stickers.
This way you can add as many stickers as you want directly to GoodNotes and have it saved for use in any file inside GoodNotes library.
Here’s how to do it:
- Download your digital bullet journal sticker set to your device (you might need to unzip the folder).
- Click on the elements tab at the top of GoodNotes menu, it will open a window. At the bottom of that window there is a carousel of existing elements set.
- Scroll to the right to find a + (plus) sign and click to add a new collection of PNG or JPEG files.
- Select all the files you want to add at once.
Then you’re done!
Now you can open the elements tab in any document inside GoodNotes and find the files you want with just a few clicks.
This digital planner sticker hack inside GoodNotes makes it super easy to find stickers quickly and effectively when you need them. So go ahead and make the element album before the next step!
2. Adding images from the photo tab on the menu
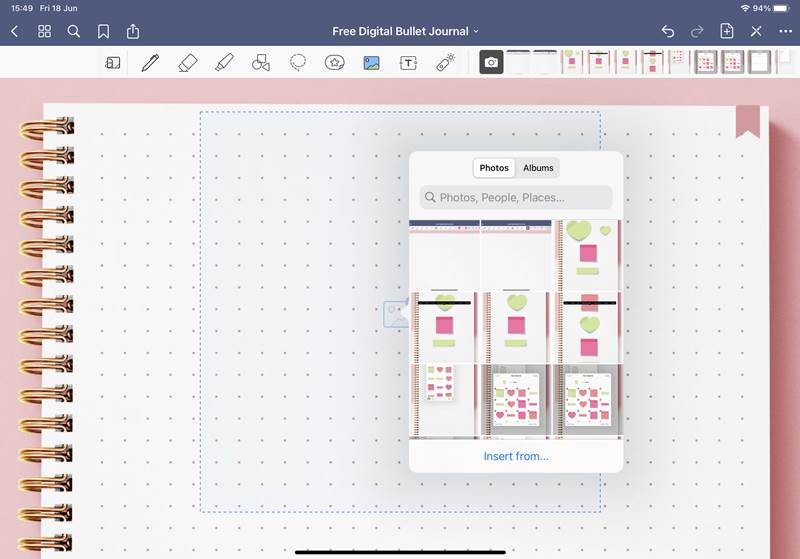
This would be the old way of adding stickers to GoodNotes before they added the elements feature.
You simply click on the photo menu, choose your image inside your device and import it as a graphic to GoodNotes. Once you’ve done that you can resize, move and crop the image as you please.
This is quite simple to do but time consuming as you can only add one image at a time.
3. Importing GoodNotes stickers books to the app
Because the previous method I just explained is quite tedious and time consuming, many digital planner sticker sellers are used to providing their customs with the so called GoodNotes Sticker Books.
A sticker book is simply a document where the images have already been added to and the entire file is shared using an extension that just GoodNotes app can read (the GoodNotes extension).
The advantage here is that all graphics are already cropped and in GoodNotes format so you only have to import the sticker book once and start using all the images inside straight away without the need to import the graphics one by one.
The elements feature sort of make the GoodNOtes sticker book obsolete as it is just as simple to make an elements collection with pre-cropped PNG images as it is to import a sticker book.
Another advantage of the elements feature is that the elements tab can be accessed straight from any document therefore it makes adding images really fast. On the other hand the images inside the sticker book require that you toggle between documents to find them, copy and then toggle back to paste the images on your digital bullet journal.
How do I add stickers to my digital bullet journal?
- Navigate to the page you want to add the digital sticker to.
- Click the elements icon or image icon, a preview of the latest images added will show on the right side of the navigation menu.
- Select Image from the preview area or click again on the icon to see more images.
- Click on the image to add it to the page.
Need to add multiple copies of the same digital sticker? Don’t waste time reimporting the image, instead:
- Select Image on the nav bar (the little icon of a photograph)
- Tap on the sticker. A blue border will appear around your digital sticker.
- Tap and hold with your stylus until the sticker looks like it is coming off the page.
- Drag your stylus to the side of the sticker and a copy of that sticker will appear.
If you want to copy and paste the sticker on another page then do this:
- Select the lasso tool on the menu
- With the lasso tool selected now make a selection on the top of the image you want to copy.
- Tap on the image to show a new option menu
- Click on copy
- Go to the page you want to paste the sticker
- Now tap and hold on the digital bullet journal page until a new option menu appears
- Tap on ‘Paste’.
How do I use Goodnotes Digital Planner stickers?
As I explained above the GoodNotes sticker book is a great idea to save your images into a sticker book in your GoodNotes app. This makes it easy to grab stickers as you are using your Digital Planner.
To do this just click the icon with the + and “Create a new Notebook”. Select the cover and paper style you want. Next type in the name of the new Notebook, we suggest keep it simple and call it Sticker Book. Click Create.
Done!
Now you can import photos from your iPad photos or even camera roll into the Sticker Book.
You will find that some Digital Stickers you buy will come as a pre-cropped sticker book. This means that the seller has already placed the Sticker files into an organized sticker book for you. You simply have to import the sticker book into GoodNotes rather than every sticker individually.
Want a free digital bullet journal template? Grab ours below!
How do you crop digital stickers?
Uncropped vs cropped Stickers
When you buy stickers you may see them labeled as cropped or un-cropped. But what is the difference?
Cropped means the stickers will be individual files and ready to use as is.
Uncropped means that various stickers usually come in one file as a sticker sheet (the whole sheet is one sticker). This means that to use the individual stickers you will have to crop them.
Cropping an image can happen when you have a sheet or just to make a different shape of your existing sticker. It can be a little fiddly to crop images yourself but GoodNotes makes it simple.
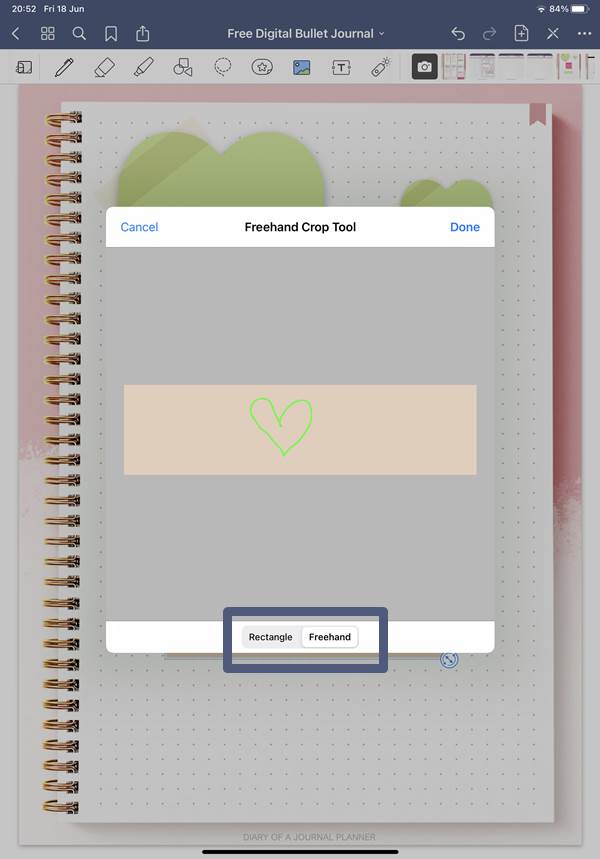
Here’s how to crop digital stickers:
- Have the sticker sheet open in GoodNotes. Make a copy of the file using the lasso tool – Always make a copy to preserve the original sticker sheet.
- Click on the photo icon and tap on the copied file to open a new options
- Click ‘Crop’
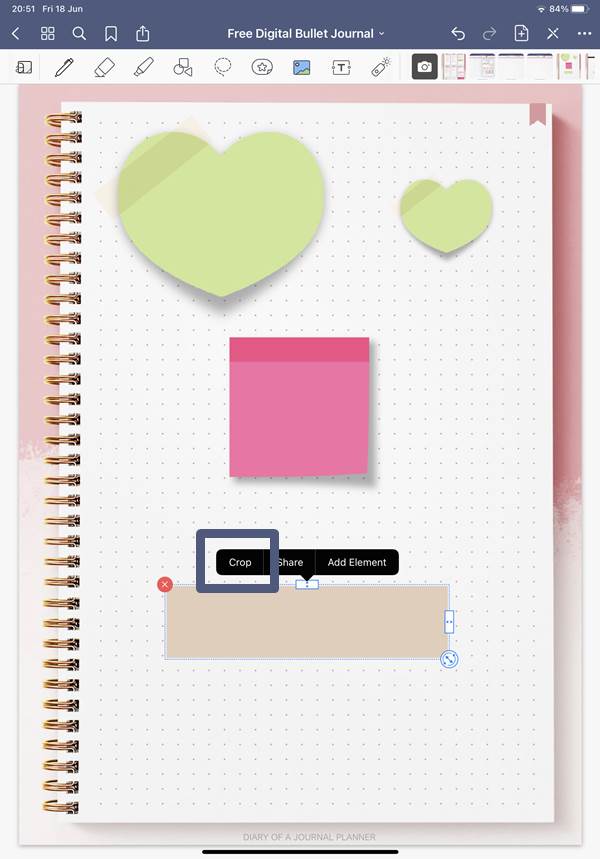
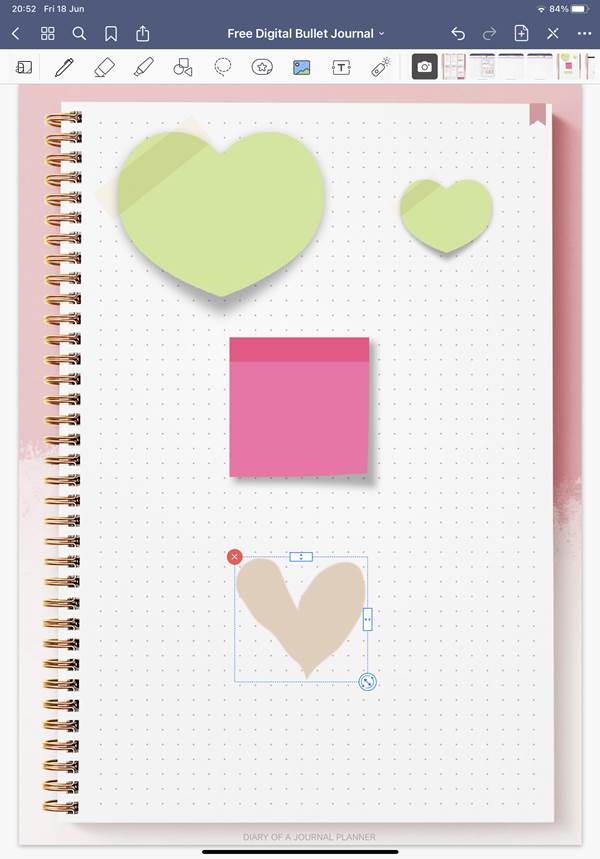
- Adjust the lines so it is just around the image you want to make a sticker. You can also use freehand. Crop.
Then you are left with a cropped sticker that you can save to your sticker book or album.
If you have any printable planner stickers from your paper planner, the great news is that you can turn them into digital stickers by scanning the sheets and cropping them too.
How Do I Use Digital Stickers?
- To use a digital sticker use the lasso tool to select the image from your Sticker Book (you can even select multiple stickers).
- If you click on the selected area a new menu will appear. Select ‘Copy”.
- Head to the page where you want your digital sticker in your planner.
- Tap and hold in the place you want the sticker. When the menu appears select ‘Paste’.
Once you have your Digital Sticker in your planner the real fun starts!
How To Resize Bullet Journal Digital Stickers
The first thing you will want to do once you have your digital sticker in your planner is to adjust the size of the sticker to suit your planner.
This is where we think Digital Planners make stickers so much easier than traditional paper Bullet Journals. With GoodNotes it is so simple to make your digital stickers bigger and smaller:
- With the image tool selected just tap and hold the image until a blue box appears around the sticker.
- You will see a small circle with an arrow at the bottom right.
- Drag your stylus here, either outwards to make the sticker bigger or inwards to make it smaller.
Looking for an easy and fast way to create Digital Stickers? Check out the Digital Sticker System HERE
We hope this post helps you try Digital Stickers in your online planners. We love hearing from our readers so tell us how you use your Digital Stickers in your planner in the comments below.
PIN FOR LATER!