GoodNotes Features For Digital Planners
If you are looking for a note-taking App for your digital planner then GoodNotes is a great place to start! Find out how to use goodnotes for digital planning and all the great features of this app.
Using a note-taking App like GoodNotes is what takes a PDF digital planner to the next level for getting organized and productive.
Full of easy-to-use tools that make a Digital Planner just like (and in some ways, we think even better) a traditional planner. From being able to use your own handwriting to bookmarking, easy editing, and adding personal style like stickers and clipart.
Yes, you will have to pay for this App but trust us, it is money well spent! It’s a once-off payment and is the magic ingredient to taking your Digital Planner to WOW!
Keep reading to find out how to get the most out of your Digital Planner by using GoodNotes. Also, note that you will need an iPad and Apple Pencil.
If you need help choosing the right one for you and your budget you can find out more in our digital bullet journal beginners guide.
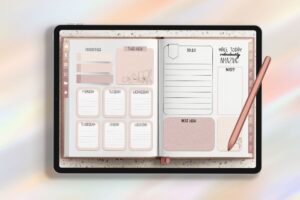
Need an amazing Goodnotes template? Discover our Digital Bullet Journal template. We have loved using traditional Bullet Journals for years so know all the features you love and want in a Digital version.
Digital Planning Basics: How To Use GoodNotes for Digital Planning
Our number one tip when starting a new Digital Bullet Journal is to experiment with the features we show you in this guide.
Everyone has different needs and will use their planner in unique ways that suit them.
Having fun playing with the different tools lets you see which ones will save you time, effort and make your Digital Bullet Journal as effective as possible for YOU!
Remember you will find some of them don’t work for you or are unnecessary with how you use your planner. And that is okay.
So how does Goodnotes work? We are so excited to show you just how amazing it is to use a Digital Planner so let’s get started.
How To Use A Digital Planner In GoodNotes
When you first open your GoodNotes App on your iPad you will find yourself in the document’s area.
Just click on your Digital Planner, Digital Bullet Journal or Digital Notebook in the documents area to start.
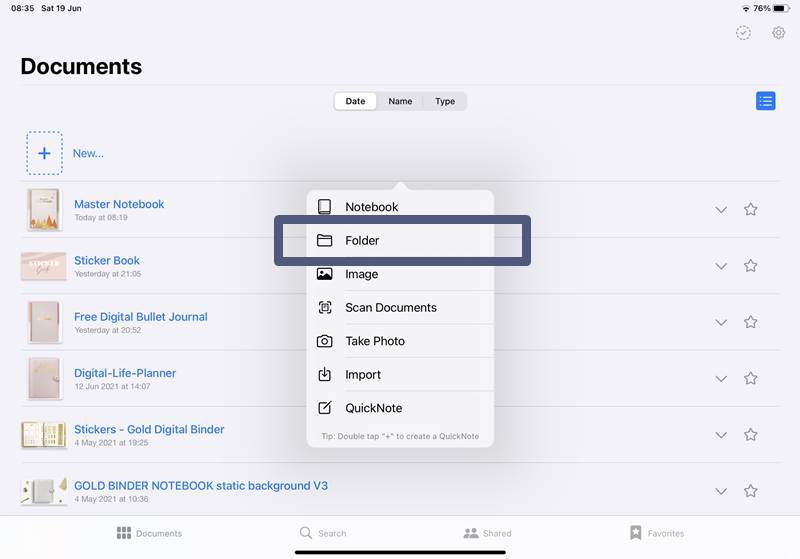
The GoodNotes Documents area
The documents area is the library, here you will see all the documents you imported.
You can organize this area by creating folders. This helps you keep your library organized and decluttered.
-
Separating documents into folders in GoodNotes
You may not use Folders to separate your documents into categories. This allows you to keep together different planners or documents of the same type/group.
If you are used to using binder systems then it is helpful to think of folders as a similar idea. For example, you have a home binder that has everything related to your home. If you had a Home Folder you would add any planners you have that relate to this, such as meal planning or your cleaning routine planner.
How to create folders in GoodNotes:
- In the document’s area click on the + sign
- Choose ‘Folder’
- Name your new folder
- Now you can add documents to this folder by tapping and holding a document and then dropping it on the top of the folder.
How to use Goodnotes as a planner
Goodnotes can be used just as a PDF annotation tool or as a digital journal or planner with tabs just like the paper versions we’re used to.
Note: The hyperlinks only work in ‘Read Mode’. To use the pen tool you have to toggle from the ‘Read Mode’ to the ‘Writing Mode’.
Follow the instructions below to learn how to use GoodNotes for digital planning.
-
‘Read Mode’ & Hyperlinks
If you have not already downloaded your Digital Planner template then head over to our helpful post on downloading a Digital Planner to GoodNotes.
When you first enter your planner you may be in Read Mode. This means you will not be able to write with your stylus but you can click on links and scroll through your planner.
We will assume that you will definitely want to write in your planner so be sure to switch over to Write Mode. To do this click on the icon to the right which looks like a pen drawing a circle.
To change back to Read Mode just click on the icon at the top right that is of a pen with a line through it.
The nav bar will now pop up which has more tools for you to use. Keep reading find out all about all the tools and how to use Goodnotes 5 on iPad.
How To Use Hyperlinks In GoodNotes:

Hyperlinks are actually part of your Digital Bullet Journal or Digital Planner, and we suggest you find planner templates that have hyperlinks to make your planner more efficient. In fact, we would go as far as to say good hyperlinks will be the difference between an amazing Digital Planner that saves you time and effort and one that annoys you and makes things harder.
These are simply links within your planner that can take you quickly to other pages as you need. Rather than scrolling to the right page. By making your planner easy to navigate you will be able to get the pages you need in the blink of an eye. Lots of planners may have these as Tabs at the side of each planner page as well as others throughout the planner.
GoodNotes makes these quick and simple to use.
First, be sure that you are in Read Mode when you are clicking on hyperlinks or you will just draw lines on the link rather than be taken to another page.
Now it is as simple as clicking on the hyperlinks in your Digital Planner to be taken quickly to the pages you need.
Hack: How to use hyperlinks in writing mode
If you want to use the hyperlink with the ‘Writing Mode’ on then you have to tap and hold the link until a option to ‘Open Link’ pops up. This helps you plan even faster.
GoodNotes Menu Icons
![]()
Below I will go through each feature in the menu from left to right, top to bottom.
-
Quickview
This allows you to quickly find pages you need, rather than having to scroll through your whole planner. Say you want to quickly find your budget sheet or your goals page, just follow the easy instructions below and save time and effort by fast-tracking to the right page.
How To Use Quickview in GoodNotes:
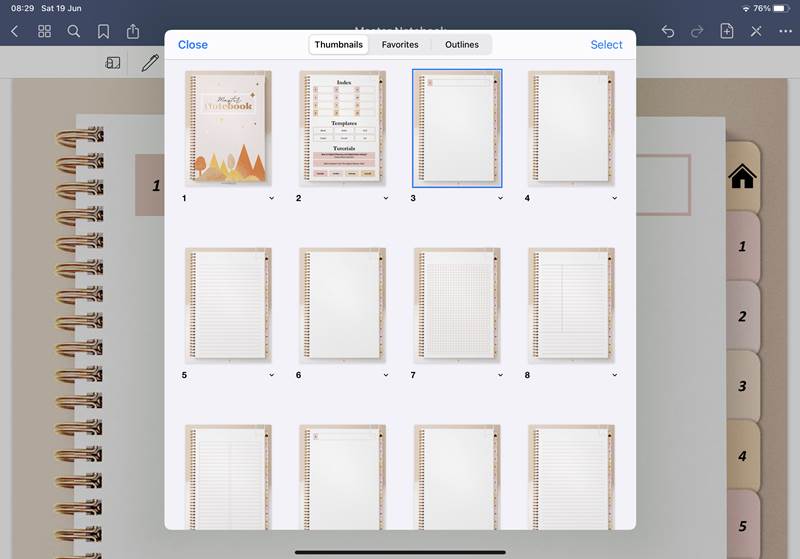
- Up in the top left-hand corner of the page, you will see a four small square formation. This is Quickview.
- Click to see thumbnail images of all the pages in your planner. You can then click on the thumbnail you want to be taken directly to that page.
-
Favorites and Outlines
Beside the thumbnail tabs in the quickview you also find the ‘Favorites’ and the the ‘Outlines’. These features are super important to use GoodNotes as a planner as they act as hyperlinked tabs to easily peruse the planner too.
Favorites and Outlines are used to help you quickly get to the pages you need when your document starts getting too big. They stop the need for scrolling through your planner to get to the pages you use often.
These features are excellent for creating a Digital Bullet Journal Index!
Some pages you may want to bookmark here are the current Month and weekly calendar pages. For example, you may have Weekly as the title. Then at the start of each new week just edit this bookmark so it is linked to the new week rather than the previous one. Easy!
How To Add Favorite Pages In GoodNotes 5:
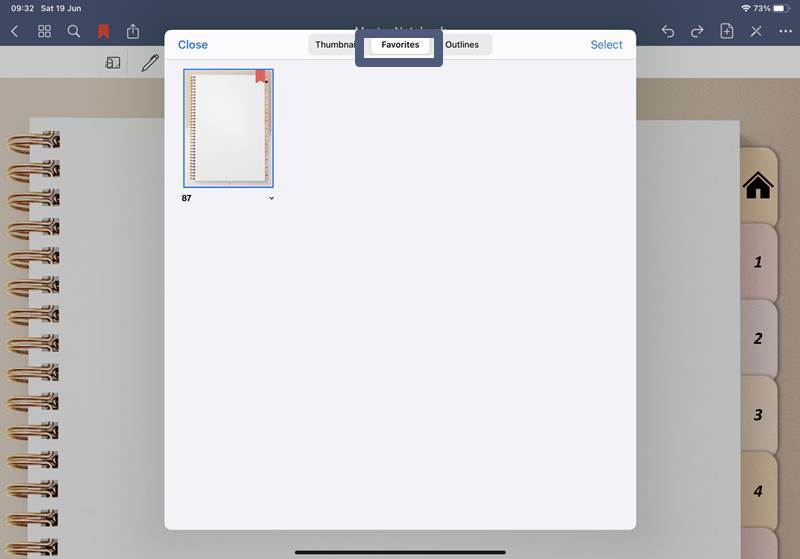
If you just want to fave just a few pages a few pages then you just need to click on the bookmark icon at the nav bar. The page you bookmark will have a red ribbon and make it easy for you to find those pages in the Favorite tabs of the Quickview.
How To Add An Outlines In GoodNotes 5:
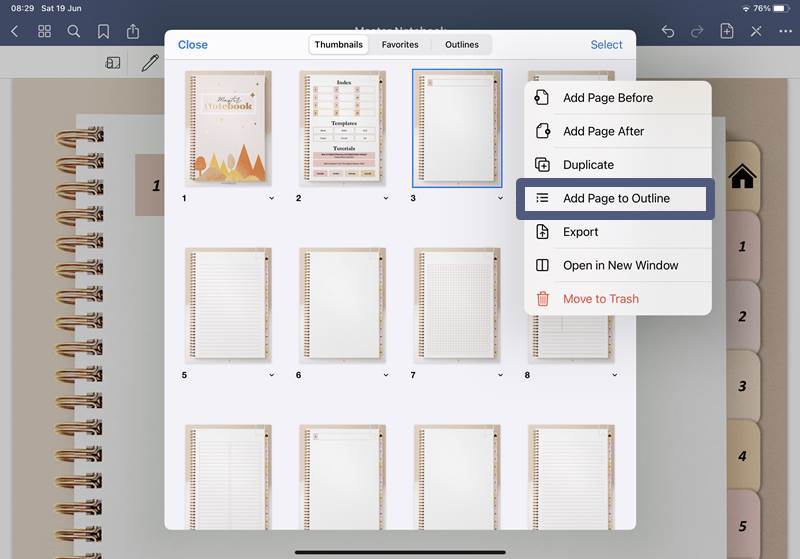
- At the top of the page, you will see a 4-square icon. Click on it.
- This opens a window showing all the pages of your document. Find the page you want to bookmark and click on the small arrow underneath it.
- Click ‘Add page to outline’.
- Now you can add a title you need to help you quickly find the pages you are looking for in the outline section.
-
Search
This is just like the search bar on any website. Type in what you are looking for and it will find any mention of your search item on the pages in your planner.
It can save you lots of time if you can’t remember where something is in your planner or if you want to find all the pages that are to do with your search item.
How To Use Search in GoodNotes:
At the top right of your page, you will see three dots. Click on this icon and a drop-down menu will appear with more options. Here you will find the search option. Just click to use and type in your search item.
-
Undo & Redo
On the top right of the page, you will see two arrows creating part of a circle. These are the Undo and Redo icons.
Undo is like a fast erase. Rather than having to ‘rub out’ your mistake, you can simply click the undo and it will take you back a step in your work. It can be a quicker and neater option to erase.
We also use this when we accidentally draw on our planner with the stylus… whoops!
The redo does the opposite and redo previous step. You can click more than once to keep undoing or redoing the previous steps, step-by-step.
How To Use Undo & Redo in GoodNotes:
On the top right of the page, you will see two arrows. The arrow pointing to the left is the Undo icon and the one pointing to the right is the Redo icon. Click on this icon to undo or redo the last step made.
GoodNotes Writing Mode Menu

Want a free digital bullet journal template? Grab ours below!
-
Zoom
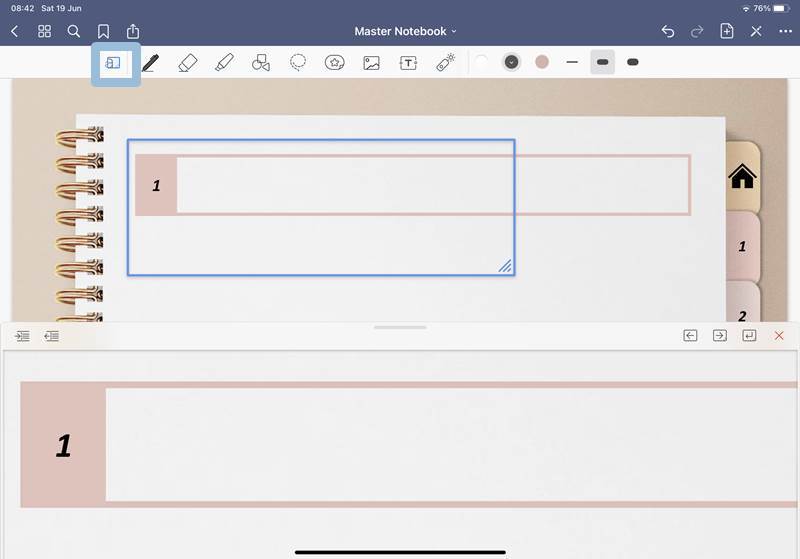
Sometimes it can be hard to write in smaller boxes when you have a whole page on the screen.
Luckily it is super easy to zoom in on GoodNotes. This lets you make smaller parts of the page take up the whole screen. Perfect for being able to write and read small writing on calendars and more. You can fit a lot in digital bullet journal pages because of this feature!
Once you have finished with the zoom you can go back to the whole page view for easy over-viewing of your page.
How To Use Zoom in GoodNotes:
To zoom in and out of the page you simply pinch with two fingers on the screen where you want it zoomed in and then move your fingers in and out until you get the correct zoom.
But here is how to use the zoom tab for writing:
- Click the icon which has the box with the letter a in it (on the far left of the nav bar). This will bring up a separate bottom bar that has a magnified area of the page where you selected.
- You can size the box so the zoom is ideal for your particular needs.
- You can then write in this area. Once finished simply click on the x at the top right of the bottom bar and the zoom will disappear and you can see your writing on the page in proportioned size.
-
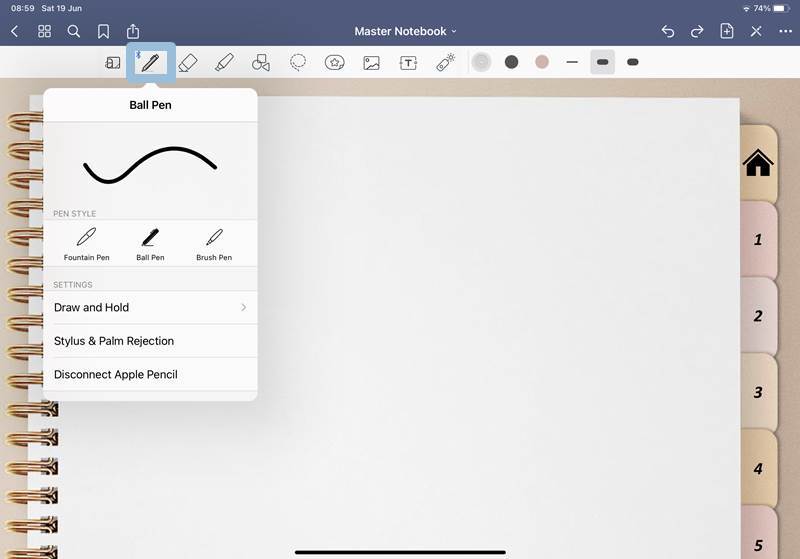
Pen tool
You know how we said that we sometimes think that Digital Bullet Journals and Digital Planners can be better than traditional journals… well this little tool is one of those reasons why.
We are stationery addicts from way back and have spent a small fortune on sooooo many different colored pens. This tool is like taking all those pens and having them at a click of a button. Saving you money and time (we know that it can take a while to find all those pens in your collection rummaging through your storage case).
You can change the color, thickness, and style of the pen you want to use.
How To Use The Pen Tool In GoodNotes:
Just click on the icon of the pen which is located at the top of the page to use the pen.
If you double-click on this tool, more options are available. Now you can select the type of pen you want, fountain, ball, or brush. Under this, you will also see the option “Palm Rejection”. This means that the iPad will only recognize the stylus and not your hand resting on the screen. We suggest that you have this selected.
To pick the color and size of the line head over to the icons on the right.
You will firstly see three color selections. This lets you set three colors that you use most often, making it so easy to swap between them (you can still use other colors of course). There are preset colors for you to choose from but if you know the Hex number of a color you can add that too.
Note: To change the color of your writing later then it is easy to use the Lasso tool which we will mention soon in this post. Just click the lasso tool, select the writing you want to be changed, tap the screen, and select color from the menu. Then choose the color you want.
To the right of the colors are three lines. These are the pen thicknesses. Just click to select. If you need a different size to the one preset then simply double click the icon. This brings up a slide bar where you can alter the thickness.
These will be set even once you leave the pen tool so that when you click back to it your options are kept.
To keep line straights with the pen tool just draw a line and hold at the end of the stroke, this will turn any line or shape straight and symmetric.
-
Eraser
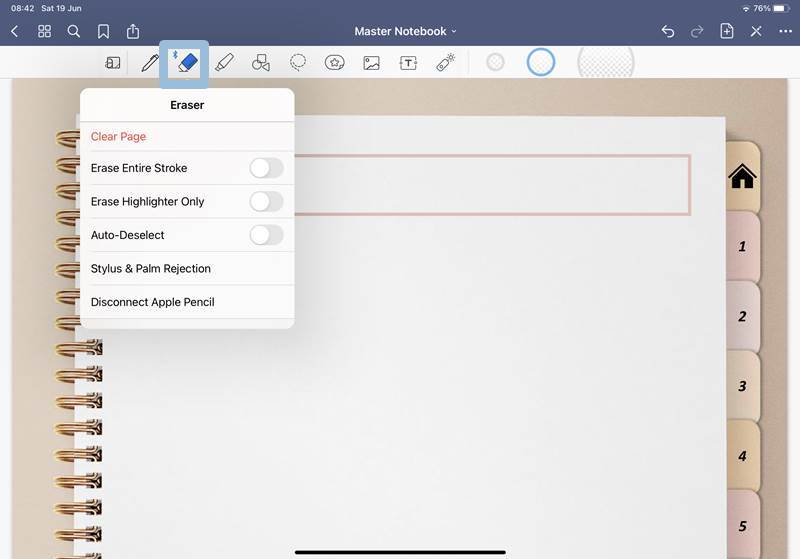
The eraser tool is located at the top of the page in the center. Just click on the icon to use. You can set the size and shape that you need and want.
How To Use Eraser In GoodNotes:
- Click on the eraser tool to erase any element created with either the pen tool, the highlighter tool or the shapes tool.
- If you click on the eraser icon twice this opens more option for your eraser.
-
Highlighter
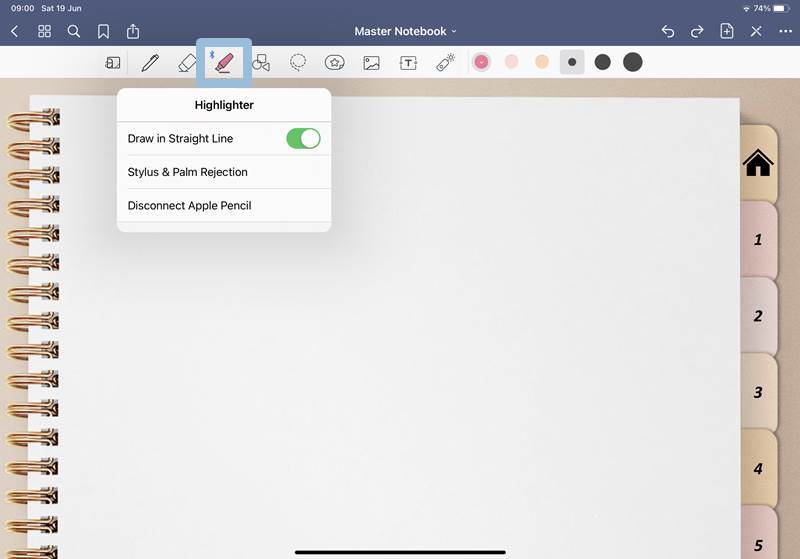
You can highlight important information just like on a paper planner with this tool.
It is easy to color-code your pages and make your planner fit your style with super customizable options.
How To Use Highlighter In GoodNotes:
Click on the highlighter icon which is located beside the eraser. Once you have clicked you will see the color options with three presets available. When you click on these you can choose a color or add your own using Hex codes.
The various size circles to the right of the colors are the thickness options. You can keep these or by click on each one you can adjust the size with the bar slide.
These will be set even once you leave the highlighter tool so that when you click back to it your options are kept. Note that these options are also different to the Pen options we mentioned before.
If you want your Highlighter to have a perfectly straight line when you use it, be sure to click the ‘Draw In Straight Line” (the green is showing on the oval). This is found when you click the Highlighter icon twice.
-
Shape Tool
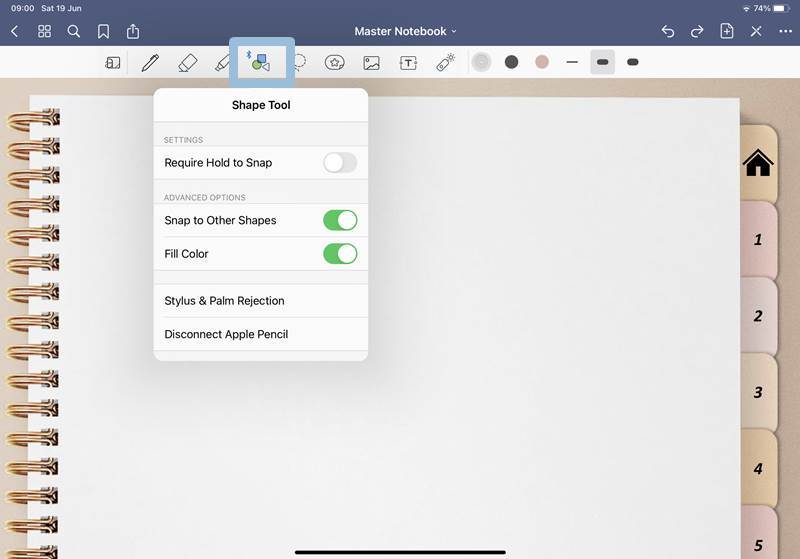
As we are self-confessed neat freaks this is one of our fav tools in GoodNotes. This changes the shapes you draw freehand into neat and clean shapes!
Say you have circled something important in your planner that you want to make stand out. Using this feature then takes your free-hand drawing and makes it a perfect circle/eclipse. Magic.
It is also great for drawing boxes.
How To Use Shape Tool in GoodNotes:
- Up at the top left of the page, you will see an icon with a circle, square, and triangle. Click this BEFORE you draw your shape and watch the magic happen!
- Once you have drawn the shape you can tap on it again to adjust the size further.
-
Lasso Tool
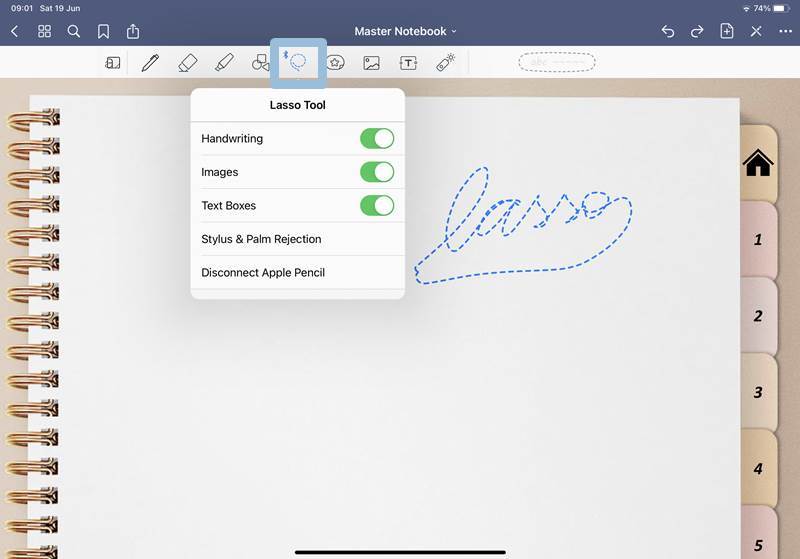
This tool is one you will use a lot. It allows you to select text and images on your pages then you can edit, crop, or move them as needed.
It is perfect for when you need to migrate information to other pages, such as monthly or weekly tasks that are repetitive.
Another great trick with this tool is that it allows you to change your handwriting to text! How magic is that? This means you can share things like notes, to-do lists, and more with other people easily.
How To Use Lasso Tool In GoodNotes:
Click on the icon at the top of the page which looks like a dotted lasso. You can now select all the information you wanted to include in the ‘lasso’. You will have to have attention to detail for the selection part as the lasso will pick up everything that you have included.
Once you have your lasso selected you can easily move it to other parts of your page or even your planner. You can also resize.
Just tap and hold the lasso selection and a menu will appear.
This menu includes screen shoot (which means it will take a photo of the lasso selection), resize (bigger or smaller), copy, paste, delete, and even change color!
Click copy to then paste your information anywhere on the same page (ideal if you need to duplicate repeat tasks), a different page in your planner, even in a different planner!
You also have convert in this menu, which is how you can change your handwriting to text.
Once you click convert your handwritten information will appear in a text box on the screen. If you click the icon at the top right you can share this text with others.
You may need to experiment with this tool and find it a little tricky at first. Persevere, as this is often every Digital Planners’ favorite tool.
-
Elements
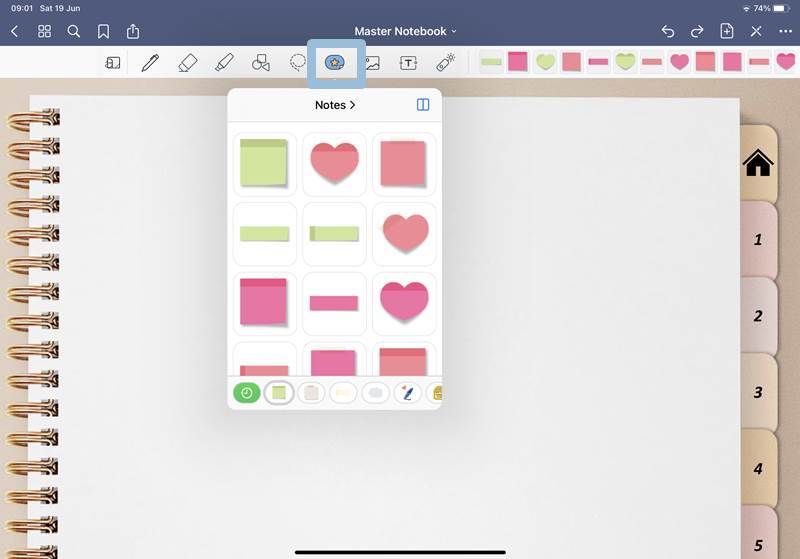
GoodNotes 5 has recently added a new feature called Elements.
Elements make it easy for you to re-use graphics, images or text inside GoodNotes.
The elements tab already comes with a few sets for you to use but you can also add your own by lassoing text or graphics and adding these elements to your collections.
Once added, you can access those elements with a quick tap and re-use them straight away.
How to use Elements in Goodnotes:
- Use the lasso tool or the import tool to add elements to your collection
- When you need to re-use these elements simply tap on the ‘Elements’ tab and search for your sticker or reusable text
- Click to add it to the page
- You can then resize and move your element wherever you want.
This is a great way to add all of your digital stickers to your digital planner or journal.
-
Images
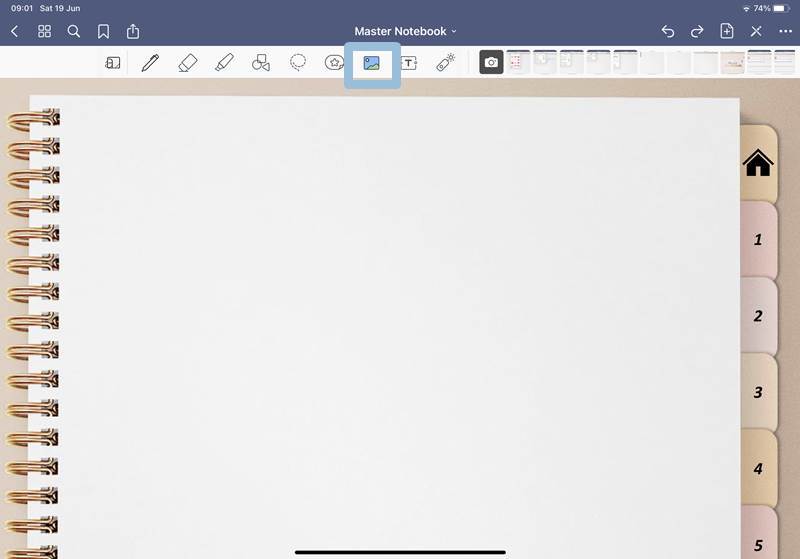
If you love to add photos and images to your planner then this tool makes it easy.
You can add images from your iPad photos and also from other files on your GoodNotes.
This is also how you can add stickers to your planner. Find out more about stickers we have a whole post on how to use stickers in Goodnotes 5.
How To Add Images or Digital Stickers in GoodNotes 5:
Simply click on the icon that looks like a little photo on the nav bar. Then choose where your photos are coming from and select the image you want to add.
You can easily move the image around and adjust the size by tapping on the blue box that surrounds the image then moving it to where you want. To resize, tap and keep the stylus on the screen, then drag the stylus. This will resize your image.
-
Type/text Tool
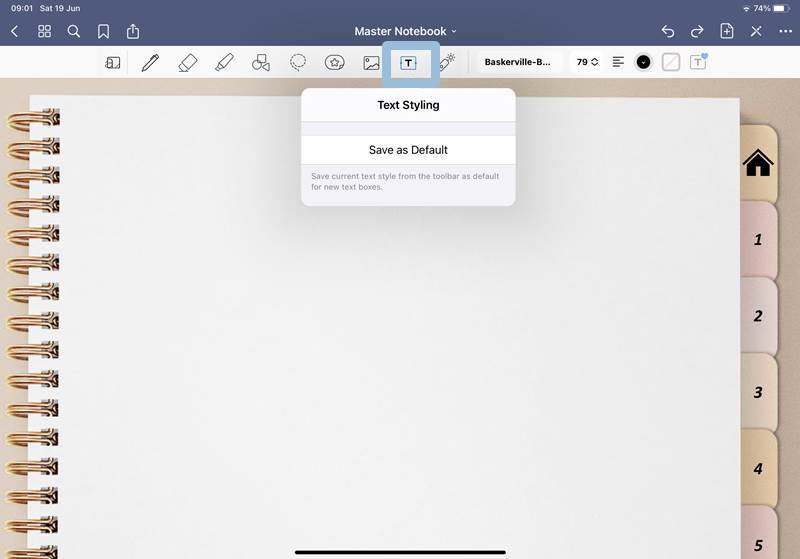
Although handwriting in your planner is amazing, sometimes you may want to type information too. Of course, if you prefer to type rather than write then you can type your whole planner… there are no rules!
With the type tool, you can select fonts, change font size and all the other great options you usually get with typing.
If you plan on doing a lot of typing in your planner you may find it easier to add a keyboard to your iPad. This is easy to do and there are lots of great Bluetooth keyboard options. Check some out [easyazon_link keywords=”ipad keyboard” locale=”US” tag=”djplanner-20″]here[/easyazon_link].
And with this tool you can also add your own handwritten font and type everything. You can make your planner look amazing with beautiful digital bullet journal fonts.
How To Use Type Tool in GoodNotes:
- Click on the icon which is a box with the letter T inside. This brings up a text box that you can place where you want on your planner page.
- Click on the area of the page you want to add a text box.
- You can start typing straight away
- You have many options to change font type, size and color.
Have you tried all these GoodNotes tools? Which ones have you found most helpful? We love to hear from our readers so be sure to let us know in the comments below.
PIN FOR LATER!